Integrate activeCollab with your website – The Ultimate Guide

activeCollab is one of the best web based collaboration and project management systems. activeCollab can handle the entire lifecycle of projects – from requests for new projects, to quoting, execution, collaboration, issue tracking, reporting, documentation and also post project support.
You’d want to integrate activeCollab in as many processes as you can. Your website is naturally going to be one of them. And you may come up with these questions…
- How can I allow clients to submit support requests from my site?
- Can I send website’s contact form submissions to activeCollab as tasks?
- How do I create a login form on my site for clients to login to activeCollab?
- I want my clients to request new projects through our website. How do I do that with activeCollab?
- What are the different ways to integrate activeCollab with my website?
- How can I embed activeCollab’s public submit form on my website? Static / WordPress / or other systems?
- What is the best way to collaborate on a project without giving an activeCollab account to people? For example, sharing a discussion or notebook pages from activeCollab?
Continue reading for answers to all these questions. What follows is the most comprehensive guide to integrating activeCollab with a website.
You may want to send information to activeCollab from your website. Or share information within activeCollab with outsiders.. activeCollab is a secure system. One can not access any activeCollab page without logging in. But there are cases where you would want to give public access to certain items as well.
Let’s begin by listing what kind of things you can bring from activeCollab to your website…
activeCollab and Your Website: What can be made public?
- Project Requests are inquiries for new projects from customers. Communicate with customers before a project is won.
- Public Forms create a new task in activeCollab from a publicly visible form. You can select which project the task will go to, and create as many public forms as you want.
- Public Sharing of project objects – tasks, discussions, notebook pages can be made public so that people who do not have an activeCollab account can also collaborate with your projects.
- Login Form can be shown on your website, so clients can quickly login to your projects’ dashboard.
Sidenote: With enough coffee and determination, you can access almost anything within activeCollab with its API (or straight database access) and show it on your website. For this guide, we will restrict ourselves to things that can be achieved with a single serving of coffee though!

Project Requests and Task Settings within activeCollab Administration
Public Task Submission Forms: posting tasks to activeCollab
Here’s how you can turn on, create and use public task submit forms.
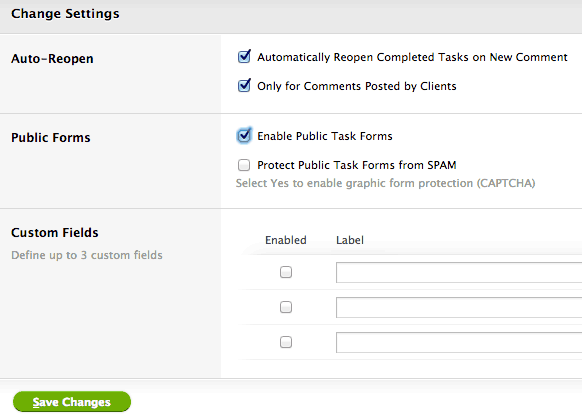
Task Settings – you must enable public task submission forms here, and then Create a new form

Creating a new public form – notice the range of options available

List of Public Submit Forms – this is where you need to send people to (or use this link in iFrame etc)
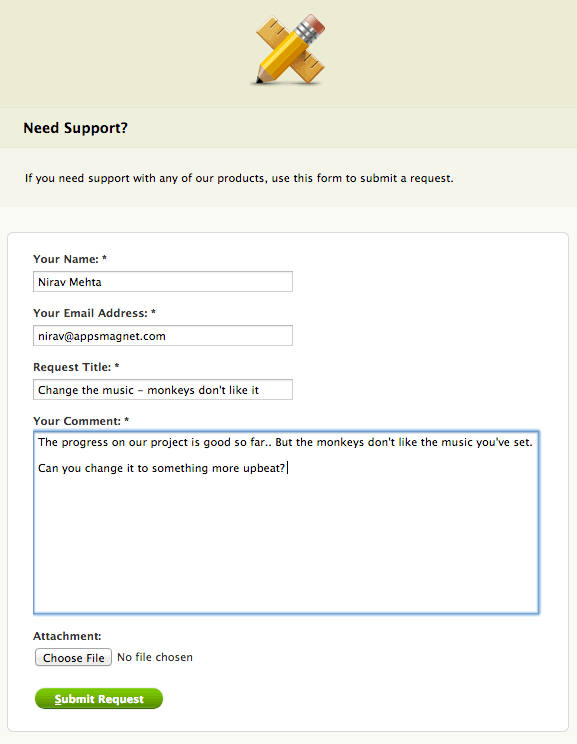
This is how Public Task Submit page will look to your visitors
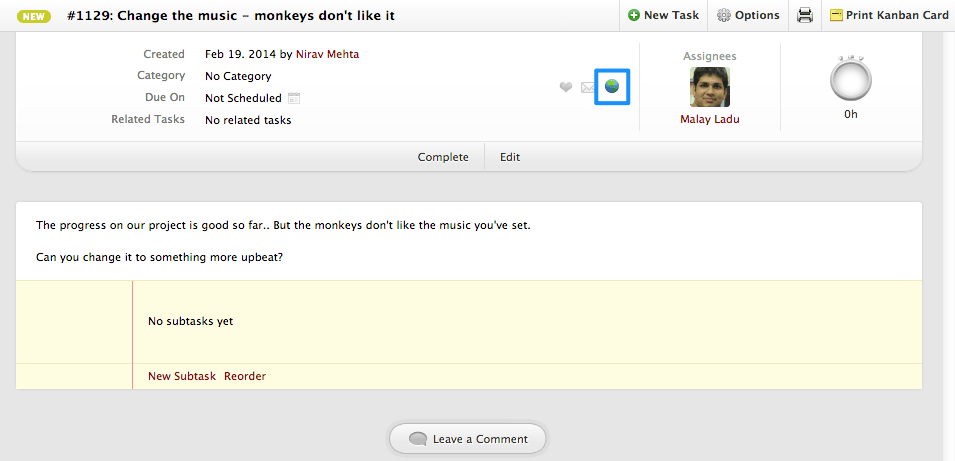
A task submitted via public form within activeCollab – notice the globe like icon indicating this was submitted from a public form
Public Project Requests: inviting new project requests
Here’s how you can turn on, create and use public project request form.
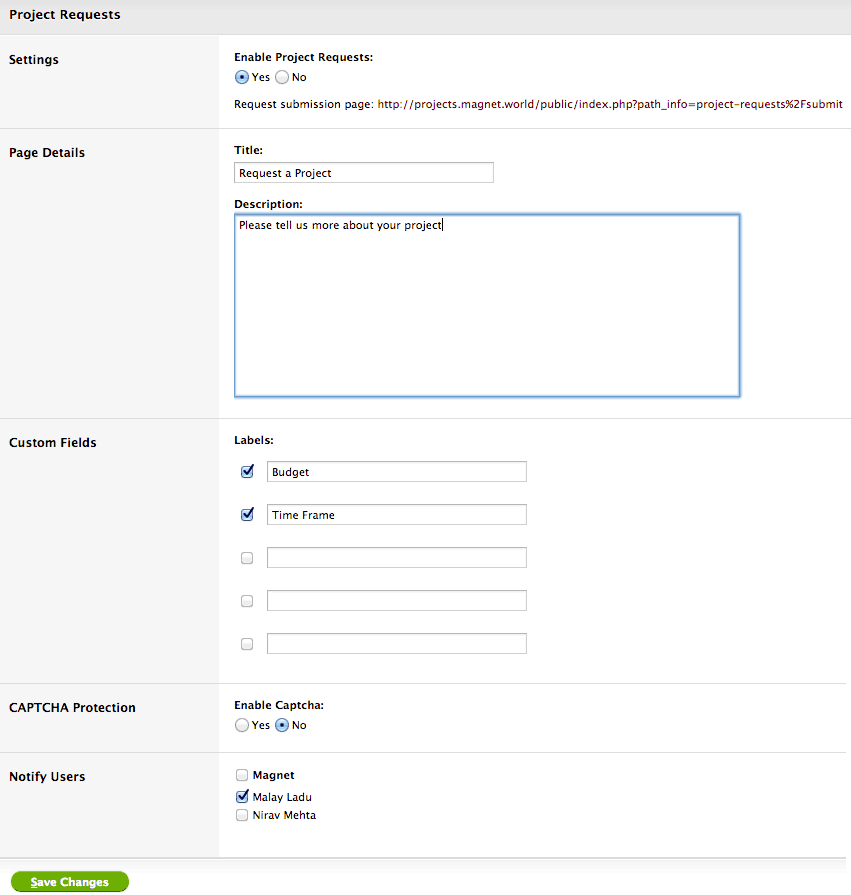
Turn on Project Requests, you can even customize messaging and collect additional data from customers
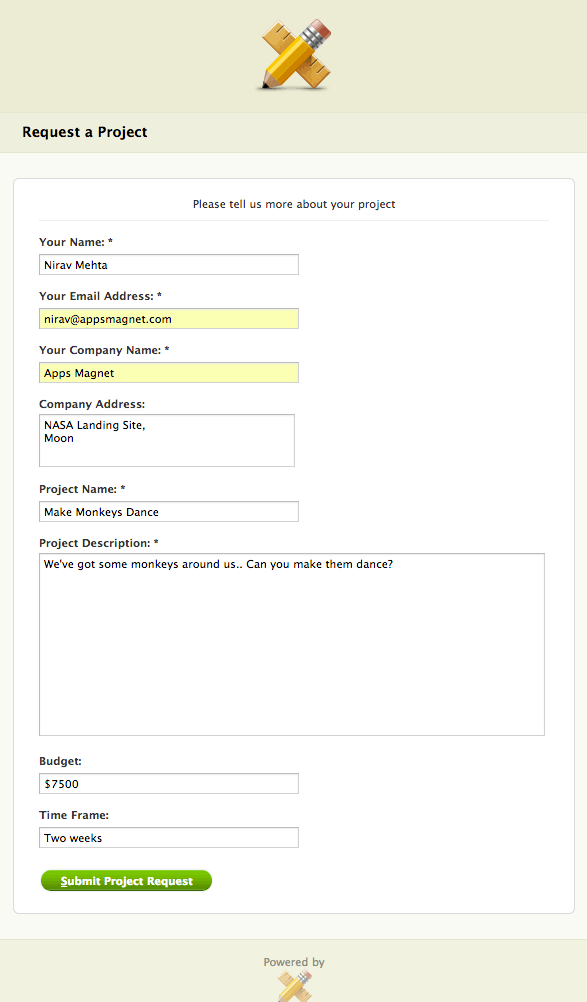
This is how Public Project Request page will look like to your visitors – you can change most of these things
Here’s the documentation about Project Requests on activeCollab site.
Integration Methods: How to link activeCollab with your site?
There are a number of methods. Choose one that suits your needs and one you find comfortable.
Direct Links to activeCollab
This is the simplest integration method. Copy the public sharing URL activeCollab provides (for project request forms, public task submit forms or sharing links for any project item) and link it on your website. You can set the target=_blank attribute on the link for it to open in a new window. You can even link to the main activeCollab URL for people to login.
If you are using direct linking, make sure to use a descriptive / understandable text for the link. You can even put the link/s in header or footer menus of your site.
Embedding with an iFrame
If you want to keep people on your site while they fill a form in activeCollab, use an iFrame. Here’s a sample code you can use.
<iframe name="aciframe" src="public-sharing-url-from-activeCollab" frameborder="0" scrolling="auto" width="100%" height="600"</iframe>
Embedding with an iFrame gives the feeling that activeCollab page is showing within your own website. If you want to modify styling of the page, things can get a little tricky though.
- You can access and change content of an iframe only if both the container page and iframe page are on the same domain – and subdomains are not considered as same…
- If you are using WordPress, there are also plugins that let you insert iFrames or shortcodes that let you insert predefined content blocks – including iFrames.
Showing in a Lightbox
This method is similar to iFrame, but can work even better. Most lightbox libraries allow showing a URL in the lightbox using iFrame. Use that feature to link to activeCollab.
This way, people will be on your site, and then see a nice modal popup for your public submit form / project request form etc. The clear distinction between the container page and lightbox will make slightly different design of activeCollab pages “natural”.
Copying HTML source code
If you want full control over styling, you can open public submit / project request form link in a browser and copy the actual HTML code. Take only the necessary <div> and format it the way you want with CSS. Make sure you are including “submitted=1″ or any other parameters as necessary in the “<form>” submission.
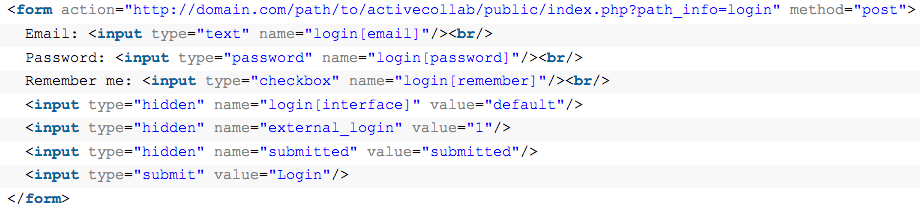
Use HTML code like this to insert an activeCollab login form on your site
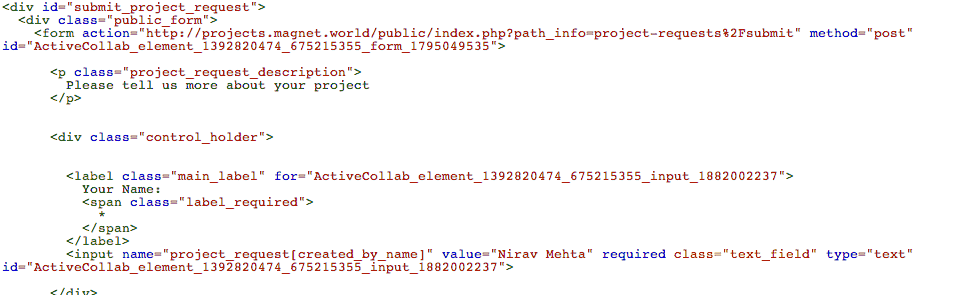
Copy HTML code from Public Project Request form and paste it to your site – make sure to keep form and input fields intact. You can skip the “id”s, and will need to point URL to your own
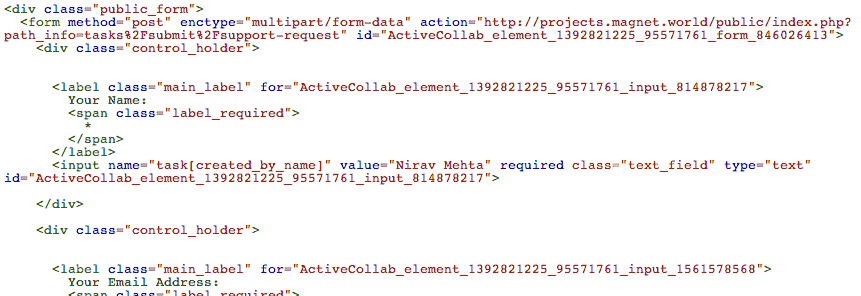
Copy HTML code from Public Task Submit form and paste it to your site – make sure to keep form and input fields intact. You can skip the “id”s, and will need to point URL to your own
One trick here…
- Set “
target” attribute on “form” to_blank– or another iframe on the page if you don’t care to show result of form submission.
Sending an Email to activeCollab
If all you want to do is create a task (or comment) within activeCollab when a form is submitted on your website, another easy way is to just send an email with form data to activeCollab. Emailing form data is very simple (tons of plugins for WordPress, many themes include it out of box, and ample solutions with other CMSes as well).
You will need to configure Incoming Mails in activeCollab for this to work though. You can hook activeCollab with any POP or IMAP account. Then set a filter for that account to create a new task or comment whenever a new email arrives to that address.
Keep in mind though:
- If the email comes from an email address that’s not in activeCollab, your comments on the newly created task won’t go to the original sender.
- To solve this, you can use our Tasks Plus module. Set it up as a transparent help desk system using the tutorial here if you wish. You then have a flexible and powerful integration that just works!
Using Zapier
If you want to use a form to submit data, and want additional flexibility – without the programming hassle, try our activeCollab Zapier integration.
Here’s how you can create a new task in activeCollab from a form submitted on your site – but sent to Zapier…
- Login to your Zapier account.
- Create a new zap, use “Webhook – POST” as a trigger, and “activeCollab – Create a new task” as action.
- Copy the webhook post URL Zapier provides you and have your form submit data to that URL.
- Connect your activeCollab with Zapier if not already done.
- Make a test post.
- Map fields from your form to activeCollab. You can select a project, a milestone, assignee etc.
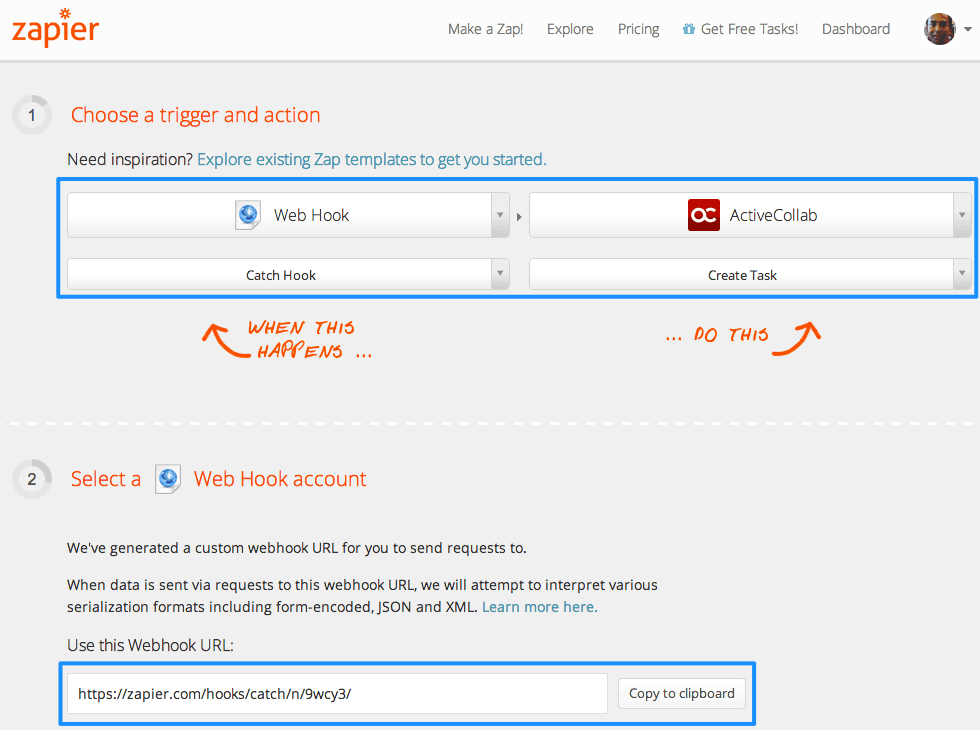
Setting up a Zap to bring data submitted to a form into activeCollab’s new task
Using activeCollab API
If you wanted full control use activeCollab API! Use your favorite programming language to bring activeCollab data to your website or take your website’s data and post it to activeCollab.
With the APIs, you can take form data from your website and create a new task, project or anything else you want!
Other things to keep in mind…
activeCollab needs to be installed on a publicly accessible URL – not on your intranet behind a firewall
For any public sharing to work, your activeCollab setup must be on a public URL. If it’s hidden behind your firewall and accessible only within the office or via VPN, outside public won’t be able to use most of these integration methods.
The only way to submit data to activeCollab in such cases is to use email. Send the email to a publicly visibly domain, and use activeCollab in your network to pull emails and import them in.
Your logo and branding will be carried forward on public page
If you are going to share activeCollab with people, make sure you upload your company logo and make any other branding adjustments. Your logo / branding will be visible on the public forms and will provide additional validation to your customers.
Questions? Experiences? Suggestions?
Have you integrated activeCollab with your website? Got any tips to share with others? Have questions?
Post a comment below to share.


Recent Comments