• Cart$0
  • My Account
  • Blog
  • Logout

Apps Magnet

  • Products
  • Demo
  • Tips & Videos
  • Help

Archive for: Tips & Tricks

Integrate activeCollab with your website – The Ultimate Guide

  • Ultimate Guide to Integrating your site with activeCollab
this entry has 0 Comments/ in Tips & Tricks, Tutorials / by Apps Magnet
February 20, 2014

activeCollab is one of the best web based collaboration and project management systems. activeCollab can handle the entire lifecycle of projects – from requests for new projects, to quoting, execution, collaboration, issue tracking, reporting, documentation and also post project support.

You’d want to integrate activeCollab in as many processes as you can. Your website is naturally going to be one of them. And you may come up with these questions…

  • How can I allow clients to submit support requests from my site?
  • Can I send website’s contact form submissions to activeCollab as tasks?
  • How do I create a login form on my site for clients to login to activeCollab?
  • I want my clients to request new projects through our website. How do I do that with activeCollab?
  • What are the different ways to integrate activeCollab with my website?
  • How can I embed activeCollab’s public submit form on my website? Static / WordPress / or other systems?
  • What is the best way to collaborate on a project without giving an activeCollab account to people? For example, sharing a discussion or notebook pages from activeCollab?

Continue reading for answers to all these questions. What follows is the most comprehensive guide to integrating activeCollab with a website.

You may want to send information to activeCollab from your website. Or share information within activeCollab with outsiders.. activeCollab is a secure system. One can not access any activeCollab page without logging in. But there are cases where you would want to give public access to certain items as well.

Let’s begin by listing what kind of things you can bring from activeCollab to your website…

activeCollab and Your Website: What can be made public?

  • Project Requests are inquiries for new projects from customers. Communicate with customers before a project is won.
  • Public Forms create a new task in activeCollab from a publicly visible form. You can select which project the task will go to, and create as many public forms as you want.
  • Public Sharing of project objects – tasks, discussions, notebook pages can be made public so that people who do not have an activeCollab account can also collaborate with your projects.
  • Login Form can be shown on your website, so clients can quickly login to your projects’ dashboard.

Sidenote: With enough coffee and determination, you can access almost anything within activeCollab with its API (or straight database access) and show it on your website. For this guide, we will restrict ourselves to things that can be achieved with a single serving of coffee though!

Project Requests and Task Settings within activeCollab Administration

Project Requests and Task Settings within activeCollab Administration

Public Task Submission Forms: posting tasks to activeCollab

Here’s how you can turn on, create and use public task submit forms.
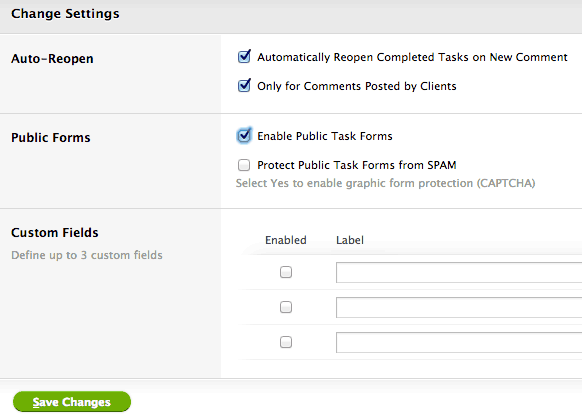
Task Settings - you must enable public task submission forms here, and then Create a new form
Task Settings – you must enable public task submission forms here, and then Create a new form

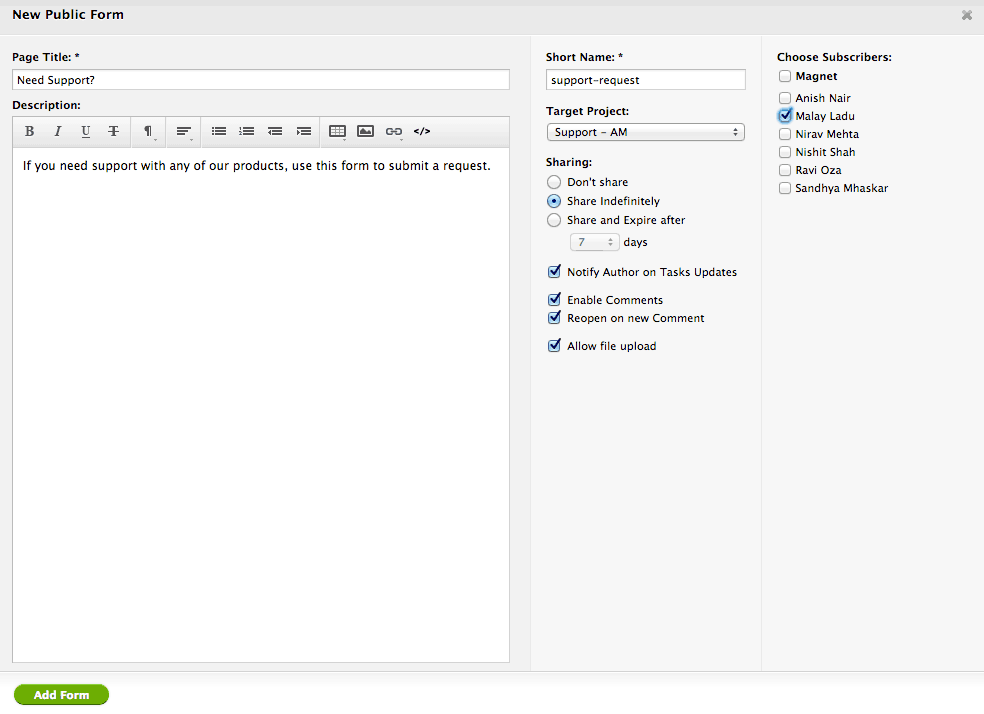
Creating a new public form - notice the range of options available

Creating a new public form – notice the range of options available

List of Public Submit Forms - this is where you need to send people to (or use this link in iFrame etc)

List of Public Submit Forms – this is where you need to send people to (or use this link in iFrame etc)
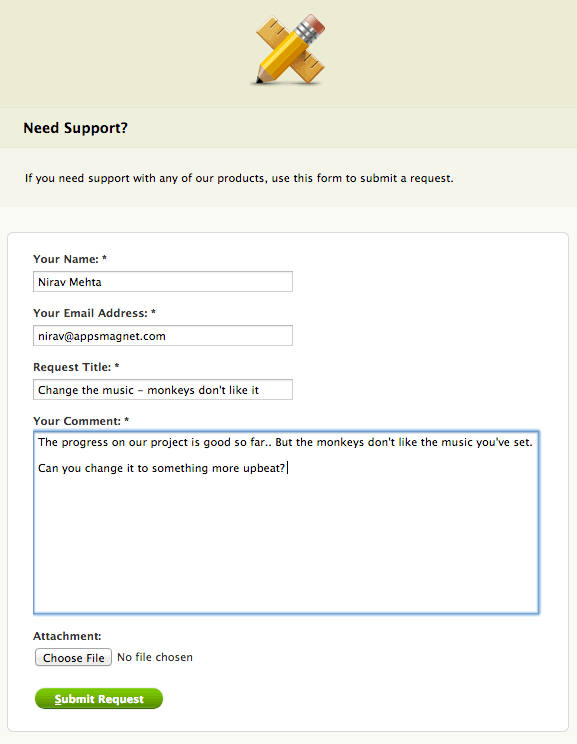
This is how Public Task Submit page will look to your visitors
This is how Public Task Submit page will look to your visitors

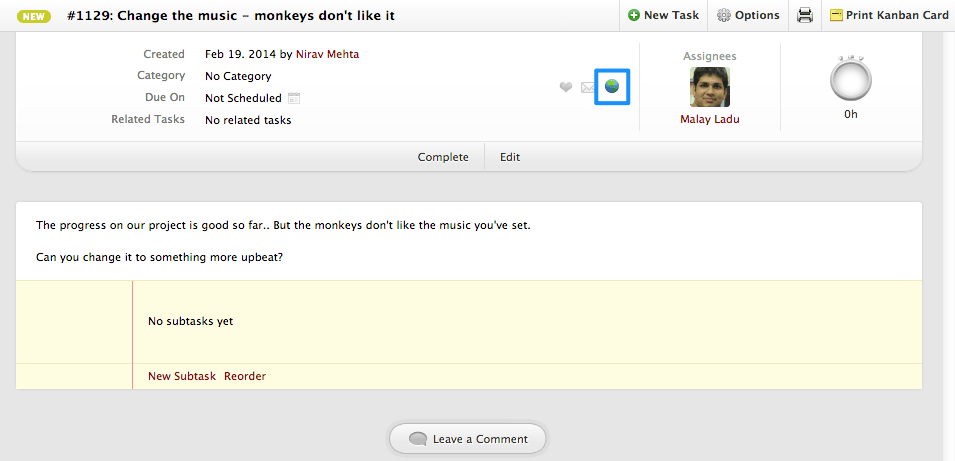
A task submitted via public form within activeCollab - notice the globe like icon indicating this was submitted from a public form

A task submitted via public form within activeCollab – notice the globe like icon indicating this was submitted from a public form

Public Project Requests: inviting new project requests

Here’s how you can turn on, create and use public project request form.
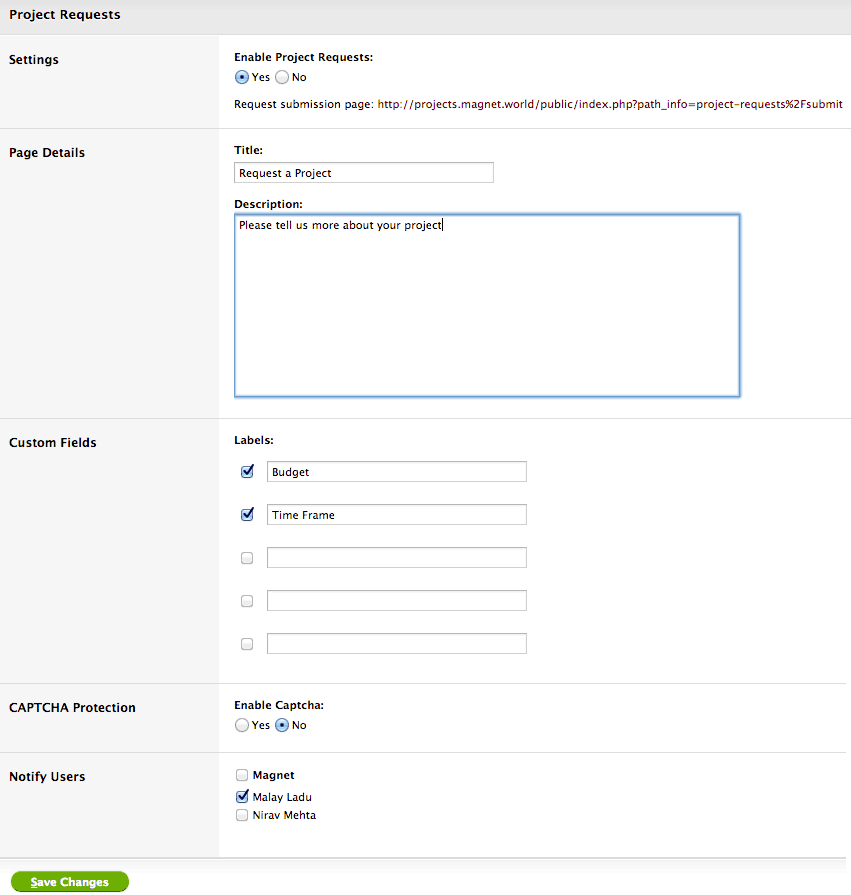
Turn on Project Requests, you can even customize messaging and collect additional data from customers
Turn on Project Requests, you can even customize messaging and collect additional data from customers

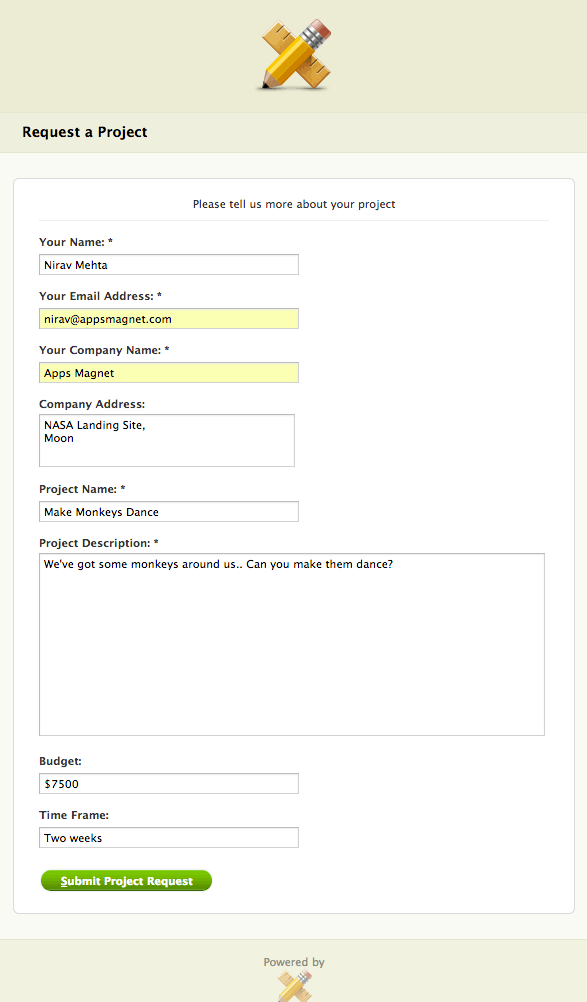
This is how Public Project Request page will look like to your visitors - you can change most of these things

This is how Public Project Request page will look like to your visitors – you can change most of these things

Here’s the documentation about Project Requests on activeCollab site.


Integration Methods: How to link activeCollab with your site?

There are a number of methods. Choose one that suits your needs and one you find comfortable.

Direct Links to activeCollab

This is the simplest integration method. Copy the public sharing URL activeCollab provides (for project request forms, public task submit forms or sharing links for any project item) and link it on your website. You can set the target=_blank attribute on the link for it to open in a new window. You can even link to the main activeCollab URL for people to login.

If you are using direct linking, make sure to use a descriptive / understandable text for the link. You can even put the link/s in header or footer menus of your site.

Embedding with an iFrame

If you want to keep people on your site while they fill a form in activeCollab, use an iFrame. Here’s a sample code you can use.

<iframe name="aciframe" src="public-sharing-url-from-activeCollab" frameborder="0" scrolling="auto" width="100%" height="600"</iframe>

Embedding with an iFrame gives the feeling that activeCollab page is showing within your own website. If you want to modify styling of the page, things can get a little tricky though.

  • You can access and change content of an iframe only if both the container page and iframe page are on the same domain – and subdomains are not considered as same…
  • If you are using WordPress, there are also plugins that let you insert iFrames or shortcodes that let you insert predefined content blocks – including iFrames.

Showing in a Lightbox

This method is similar to iFrame, but can work even better. Most lightbox libraries allow showing a URL in the lightbox using iFrame. Use that feature to link to activeCollab.

This way, people will be on your site, and then see a nice modal popup for your public submit form / project request form etc. The clear distinction between the container page and lightbox will make slightly different design of activeCollab pages “natural”.

Copying HTML source code

If you want full control over styling, you can open public submit / project request form link in a browser and  copy the actual HTML code. Take only the necessary <div> and format it the way you want with CSS. Make sure you are including “submitted=1″ or any other parameters as necessary in the “<form>” submission.

Use HTML code like this to insert an activeCollab login form on your site

Use HTML code like this to insert an activeCollab login form on your site

Copy HTML code from Public Project Request form and paste it to your site - make sure to keep form and input fields intact. You can skip the "id"s, and will need to point URL to your own

Copy HTML code from Public Project Request form and paste it to your site – make sure to keep form and input fields intact. You can skip the “id”s, and will need to point URL to your own
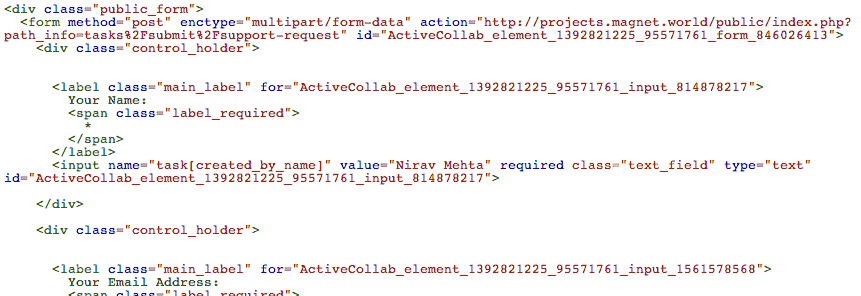
Copy HTML code from Public Task Submit form and paste it to your site - make sure to keep form and input fields intact. You can skip the "id"s, and will need to point URL to your own

Copy HTML code from Public Task Submit form and paste it to your site – make sure to keep form and input fields intact. You can skip the “id”s, and will need to point URL to your own

One trick here…

  • Set “target” attribute on “form” to _blank – or another iframe on the page if you don’t care to show result of form submission.

Sending an Email to activeCollab

If all you want to do is create a task (or comment) within activeCollab when a form is submitted on your website, another easy way is to just send an email with form data to activeCollab. Emailing form data is very simple (tons of plugins for WordPress, many themes include it out of box, and ample solutions with other CMSes as well).

You will need to configure Incoming Mails in activeCollab for this to work though. You can hook activeCollab with any POP or IMAP account. Then set a filter for that account to create a new task or comment whenever a new email arrives to that address.

Keep in mind though:

  • If the email comes from an email address that’s not in activeCollab, your comments on the newly created task won’t go to the original sender.
  • To solve this, you can use our Tasks Plus module. Set it up as a transparent help desk system using the tutorial here if you wish. You then have a flexible and powerful integration that just works!

Using Zapier

If you want to use a form to submit data, and want additional flexibility – without the programming hassle, try our activeCollab Zapier integration.

Here’s how you can create a new task in activeCollab from a form submitted on your site – but sent to Zapier…

  • Login to your Zapier account.
  • Create a new zap, use “Webhook – POST” as a trigger, and “activeCollab – Create a new task” as action.
  • Copy the webhook post URL Zapier provides you and have your form submit data to that URL.
  • Connect your activeCollab with Zapier if not already done.
  • Make a test post.
  • Map fields from your form to activeCollab. You can select a project, a milestone, assignee etc.
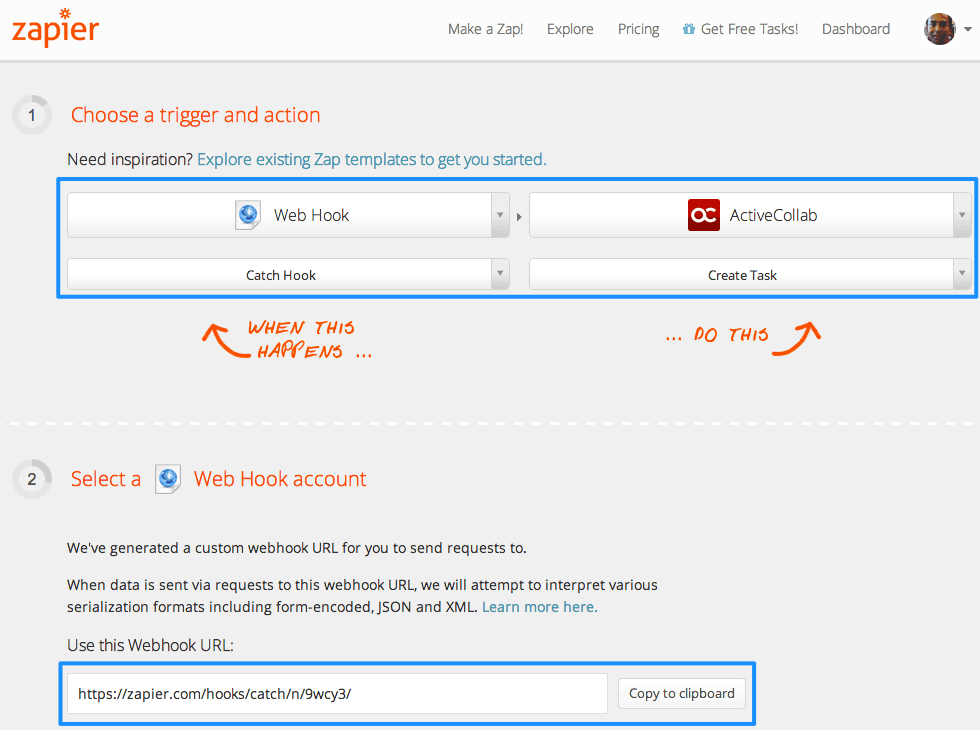
Setting up a Zap to bring data submitted to a form into activeCollab's new task

Setting up a Zap to bring data submitted to a form into activeCollab’s new task

Using activeCollab API

If you wanted full control use activeCollab API! Use your favorite programming language to bring activeCollab data to your website or take your website’s data and post it to activeCollab.

With the APIs, you can take form data from your website and create a new task, project or anything else you want!

Other things to keep in mind…

activeCollab needs to be installed on a publicly accessible URL – not on your intranet behind a firewall

For any public sharing to work, your activeCollab setup must be on a public URL. If it’s hidden behind your firewall and accessible only within the office or via VPN, outside public won’t be able to use most of these integration methods.

The only way to submit data to activeCollab in such cases is to use email. Send the email to a publicly visibly domain, and use activeCollab in your network to pull emails and import them in.

Your logo and branding will be carried forward on public page

If you are going to share activeCollab with people, make sure you upload your company logo and make any other branding adjustments. Your logo / branding will be visible on the public forms and will provide additional validation to your customers.

Questions? Experiences? Suggestions?

Have you integrated activeCollab with your website? Got any tips to share with others? Have questions?

Post a comment below to share.

Little Used Yet Simple Technique to Boost Attention & Productivity

  • Little Used Simple Technique to Boost Attention
this entry has 0 Comments/ in Specials, Tips & Tricks / by Apps Magnet
February 15, 2014

We are living in an age of distraction. There is a lot noise – and really bad noise. In this video, we share a little used technique that tremendously boosts attention and productivity not only for you – but also for your team mates.

Watch the full video to discover the details.

Highlights From The Video

  • Results are a function of attention and focus.
  • If a task demands higher level of attention than what we supply, we will fail at it.
  • Moderate noise improves performance.
  • Popular music is bad for productivity.
  • Music without lyrics works best.
  • Boring tasks become interesting with music.
  • Start with upbeat music.
  • Minimal music works best for focus and relaxation.
  • Play music you like.
  • Background music increases focus…

Compared to a relatively quiet environment (50 decibels), a moderate level of ambient noise (70 dB) enhanced subjects’ performance on the creativity tasks, while a high level of noise (85 dB) hurt it. Modest background noise, the scientists explain, creates enough of a distraction to encourage people to think more imaginatively.

Journal of Consumer Research report, March 2012. (details here)

Free Music & Resources

  • 3 Hours of relaxing music
  • Relax Daily’s 2.5 hour instrumentals – they have a great collection
  • Rainmood – realistic rain sounds + other combinations (links in their tweets)
  • Simply Noise – white noise and much more
  • August Ambience – Excellent ambient, nature sounds
  • Mix and play ambient / natural sounds
  • Soundrown – best sounds to get work done – from coffee and rain to playground
  • Music for Programming – growing collection of music for programmers
  • 63 playlists for programming – good quality and variety
  • Chillout on Digitally Imported – many swear by this
  • Goa Psy on Digitally Imported
  • Coffee Shop sounds apps – Good coffee shop sounds – morning, lunch and more
  • Koan Music – Excellent source
  • Relax Melodies free app for iOS / Android – more for relaxation, works great
  • Star Trek Enterprise Engine ambient noise

Feedback Welcome

Do you use background music for yourself / your organization? Did you notice any changes in performance / engagement after trying this out?

We’d love to hear from you! Post your comments below!

Floodgates for activeCollab – taking control of emails and notifications

this entry has 0 Comments/ in Tips & Tricks / by Apps Magnet
February 14, 2014

If you have a lot of things going in activeCollab, you will end up with a lot of notifications. Emails about tasks, comments, files, milestones and everything else. All those emails look more or less the same, and if you are like me, you will quickly get tired of them.. You have the Notifications Center in status bar too – that shows updates on all items you are involved with..

But here’s a quick two minute configuration guide on setting up flood gates for activeCollab notifications.

This video covers:

  • Turning off email notifications globally
  • Allowing specific user roles to turn on emails
  • Determining how the notifications center shows up in your status bar
  • Take precise control over what kind of in-app notifications you get with our free Notifications Plus module

Additionally, you can:

  • Let users control their notifications preferences from their “Settings” panel – from their avatar in left menu and then “Settings”. Or going to an individual user’s profile and clicking on “Settings” in “Options”.
  • Let users control their own Notifications Plus settings from their “Notifications Settings” under “Options” in their profiles.
  • Mute and Unmute in-app notifications from Notifications Plus when you do not want to get distracted
  • Or simply – set up filtering rules in your email client to keep notifications you want and discard others…

Hope this helps!

How we setup a multi brand support ticket system with activeCollab

this entry has 0 Comments/ in Tips & Tricks, Tutorials / by Apps Magnet
August 8, 2013

Background / Problem

  • We operate different brands – Apps Magnet (our activeCollab solutions), Store Apps (our WooCommerce and WordPress ecommerce extensions) and Putler (our sales analytics system).
  • While different team members work on these brands, we did not want three separate support ticketing systems / helpdesk systems.
  • We’ve used WHMCS for over two years to manage support for all these brands.
  • But we always preferred to have something integrated with activeCollab for smoother workflow – and not needing to login to two separate systems.
  • More importantly, we wanted customers to feel they are interacting with real people and not a software! We wanted to eliminate all the complexities of a typical support system – auto responders, ticket URLs etc..

Digging Deeper – possible solution and a roadblock…

  • We can use our own Tasks Plus module to build an “invisible helpdesk”. That way support requests work like normal emails, but are still tracked and managed within activeCollab.
  • We can configure multiple mailboxes, filters and projects. One for each brand. activeCollab will fetch the email, and filter for that mailbox will push the incoming email as a new support ticket task for the “Support – Brand Name” project.
  • If we wanted all emails to create a task in the same project, a single filter would do.
  • Tasks Plus will also make sure outgoing emails are going from the “support” email address and not individual person’s. So it is a very good fit.
  • BUT we wanted emails to go out from the SMTP server of the particular brand. We did not want Store Apps emails going off Apps Magnet SMTP server or vice versa. And activeCollab allows setting up a single SMTP server.

Enter Mandrill!

  • Mandrill is “SMTP as a service” offering from MailChimp.
  • Instead of sending emails out via native email functions in activeCollab, we could use Mandrill’s SMTP.
  • There were a number of advantages in using Mandrill over our own SMTP server. First, Mandrill is from MailChimp. And they specialize in email and deliverability. So we can rely on them to send out email well. Second, Mandrill offers flexible tracking and filtering options. Third, it’s affordable. The free plan offers 12,000 emails per month – which is well under our limits.
  • The real bonus was to setup SPF and DKIM records for Mandrill on our domains. This essentially lets the world know that Mandrill is authorized to send emails on our behalf. This step reduces chances of mails getting marked as spam and is a good practice.

Final Solution

  • Create one mailbox, filter and project for each brand in activeCollab.
  • Use Tasks Plus to mark incoming mails as support tickets, allow receiving emails from people not registered in activeCollab, send comments posted on the task as a simple email reply, set incoming mailbox as the “sender” of replies, and basically integrate with our workflow.
  • Use Mandrill for sending out emails. Configure it in activeCollab as the single SMTP server.
  • Setup SPF and DKIM entries in DNS for each domain. Proving Mandrill’s authority to send email on our behalf.
  • Test and go live!

We are live! Any email you send to support address of these brands, is now landing in our single activeCollab setup. Our team responds to the task, and that comment comes to you (via Mandrill) as a “conversational email reply” – hiding the support system completely. We can now easily use workflow labels, track hours and do reporting on these support tasks!!

Do you manage multiple brands? Want to integrate an invisible helpdesk with activeCollab?

Try this solution then! It works like a charm!

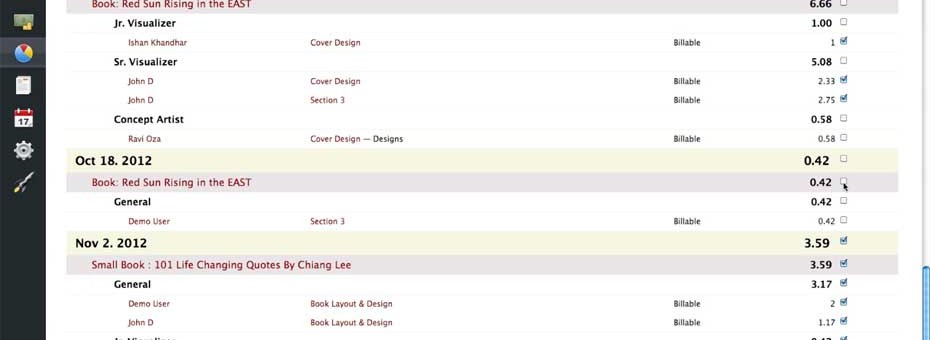
Batch Update Time Records with Time Reports Plus

  • Batch Update Time Records
this entry has 0 Comments/ in Tips & Tricks, Tutorials / by Apps Magnet
November 9, 2012

Many times you need to update multiple time records in activeCollab. Time Reports Plus makes it super easy to manage these – round them up, adjust them, change billable status and more.

This video walks you through the whole process with Time Reports Plus.

Troubleshooting activeCollab 3 errors

this entry has 0 Comments/ in Tips & Tricks / by Apps Magnet
July 10, 2012

Watch the video above to solve “Failed to load page” / 409 conflict error in activeCollab 3. You will also discover tips on how to find real causes of activeCollab 3 error messages (like 500 internal server error, fatal error etc) using Developer Console and going through backtraces and error logs.

Even if you can’t solve the exact problem, the solutions shown here will help you narrow down the causes and send details to developers so that they can easily debug and find a fix for you.

Recovering tags lost in upgrading to activeCollab 3

this entry has 0 Comments/ in Tips & Tricks / by Apps Magnet
June 27, 2012

If you are wondering where did all the tags go after upgrading to activeCollab 3, do not worry. They are backed up and you can easily recover them (with a little bit of SQL query magic!)

Here’s a DB query to verify that the tags and their parent items are correct:

select po.id, po.name, po.type, t.tags, t.parent_id 
from acx_project_objects po, acx_tags_backup t
where t.parent_id = po.id and t.parent_type = po.type

Once you have verified this is correct, you can run the following query to append all the tags to the title of the Discussion / File / Task / TodoList…

update acx_project_objects po, acx_tags_backup t
set po.name = concat(po.name, ' [# ', trim(t.tags), ']')
where t.parent_id = po.id and t.parent_type = po.type

You can run the earlier query again to check names have been updated…

The most important part here is “concat(po.name, ‘ [# ‘, trim(t.tags), ‘]’) as name” part. It appends the tags to the name and puts a square bracket around them. If you know a bit of MySQL, you can change this the way you like. You may also want to append tags to the “body” field (description) and not the title.

Once you’ve done this, rebuild the project objects search index from admin so that you can search on these tags.

Hope that helps!

Using Communications as Global Documents in activeCollab

  • Communication used to post a global confidential document
this entry has 0 Comments/ in / in Tips & Tricks / by Apps Magnet
April 21, 2011

The Problem

activeCollab Documents Module

activeCollab comes with a Global Documents module. This module allows you to upload a file – text or otherwise – and have it be visible to all users of the system. This is great for storing common documents – policies, questionnaire, usage documentation, templates etc. Global Documents are visible to everyone – both owner company people and all clients.

Confidential Items Module

On the other hand our Confidential Items Module has been very popular. For example, you can make a ticket confidential. Confidential items can be seen only by people who are assigned to them, subscribed to them or are administrators. So in a client project, you can make an internal work item as ticket and assign it to your own team. This means the item (and all its comments / tasks / time records / attachments etc) won’t be visible to the client.

Can we make Documents confidential?

As people used Confidential Items more and more, they wanted more and more things to be confidential :-) One of the request was to make Global Documents confidential. So that they will be accessible easily (from a link in top toolbar, without needing to go to each project), but can be seen only by designated users.
Truth be told, we also wanted this feature. As a matter of fact, we began implementing it in the first version of Confidential Items itself. The problem is that it can not be implemented the way activeCollab is designed today. Global Documents do not have people assigned to them. They do not have subscribers. They are open to all.

We can make an item confidential only if we know the list of people for whom it should be visible.

Since we don’t have a list of people with global documents, we can’t make them confidential. (Sure, you can select people who will get a notification about a newly created document, but this list is not stored and can’t be edited later. They are not “subscribers” who receive alerts about updates.)

Adding a list of people with global documents will require many changes to the module – something that won’t be retained across upgrades and can cause hassles.

The Alternative Solution

Every problem has multiple solutions!

While I and Malay were brainstorming on this, we got an easy way out. Something that will serve the purpose as Global Confidential Documents and could fit in nicely with activeCollab.

The Communications Module.

You can make a communication visible to everyone, or select a list of participants. Communications module also allows you to lock user comments and attach files. Attachments of Communications are only visible from the communication itself.

Put these together and you have Global Documents, that can also be confidential.

Here’s how you can do it:

  • Create a new communication.
  • Add some title and description.
  • Select participants – people who can see this communication. You may also select a type and whether the communication is visible on the dashboard if you wish.
  • Post the communication.
  • Go to the communication’s page.
  • Post a new reply to the communication and attach the document you want.
  • Once your reply is posted, lock the communication to prevent further comments.
  • There you have it! Participants can now access this communication either via its direct permalink, or click on the Comm. link in toolbar and find it there. They can download the attachment, but can not make new replies / comments. All other people will simply not see this communication!
Communication used to post a global confidential document

Communication used to post a global confidential document


So can Communications Module replace the Documents module?

Documents module is great to share common files, and shows an interface oriented for file sharing (document list on left, categories on right). So if you use file sharing heavily, it’s great.

But for most other users, Communications Module can serve file sharing needs just as well. Removing Documents module also reduces one icon from the top bar – making the UI easier. The name “Comm.” may not explicitly tell people that they will find documents there, but a little training (or opting to notify participants when a communication is created) can solve that as well.

Was this helpful? What do you think?

What do you think about this tip? Was it helpful? How do you use Communications module? Post a comment below!

How to fix “System configuration option does not exist”

  • System configuration option
this entry has 0 Comments/ in / in Tips & Tricks / by Apps Magnet
September 22, 2010

Symptom

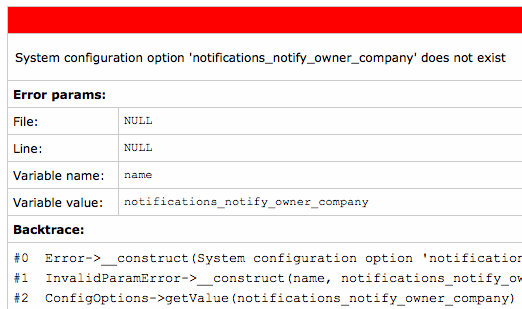
You receive an activeCollab Crash Report about a missing “System configuration option”.

The error message may look similar to:

activeCollab setup at http://www.yourdomain.com/public experienced fatal error.
Info: System configuration option '' does not exist

Error params:
File: NULL
Line: NULL
Variable name: name
Variable value:

Backtrace:

#0  Error->__construct(System configuration option '' does not exist, 1) called at [/home/public_html/activecollab/angie/classes/errors/InvalidParamError.class.php:46]

#1  InvalidParamError->__construct(....) called at [/home/public_html/activecollab/application/modules/system/models/config_options/ConfigOptions.class.php:40]

#2  ConfigOptions->getValue() called at [/home/public_html/activecollab/application/modules/notifications/controllers/NotificationsAdminController.class.php:76]

Problem

A module is looking for its system configuration parameter that is not yet set up in activeCollab.

Cause

You installed a new version of a module that contains a new configuration option. But missed Uninstalling and Installing the module from activeCollab admin. Installing a new module creates its required configuration option. So if a new configuration option was introduced in the module and you missed installing the module, that option is not yet present in activeCollab. That presents you with the above error.

Solution

  1. Figure out the name of the module from the configuration option name, or from the file name in the Backtrace. In our case, it’s Notifications module. (it could be Backup module, Planning module or any other module).
  2. Go to activeCollab administration.
  3. Uninstall and Reinstall the module.
  4. That should fix the problem.

Using your own logo in activeCollab

this entry has 2 Comments/ in / in Tips & Tricks / by Apps Magnet
October 27, 2009

Do you know you can easily replace the activeCollab logos with your own? Here’s how you do it.

Using your own logo in header

Make a GIF image of your logo. Maximum size 100x45 pixels. Save it as “logo.gif” and replace it in the “public/brand” folder within activeCollab installation. Refresh an activeCollab page and you should see your own logo now.

Workaround for Access theme

If you are using Access theme, edit “public/assets/themes/access/theme.css“. Near the top you will see some CSS code for “.site_logo” and “#login_company_logo“. Change the “background” property for both and use “url(../../../brand/logo.gif)” for both. Ensure to put correct number of “../“. Save and re-upload the file to server, clear the “compile” folder and refresh! It should show your logo now!

Removing logo from footer

BTW, if you want to remove activeCollab logo from the footer, you can do that by purchasing Branding Removal from them.

Logo for Invoices

You can also replace the logo used in invoices by replacing an image named “invoicing_logo.jpg” (maximum 200×90 pixels) in “public/brand” folder.

Replace icon for URL bar in browser (favicon)

Similarly, you can change the icon that shows up in the browser’s URL bar by putting in a 16×16 “favicon.png” image in the same “public/brand” folder.

Make sure you make these images in appropriate dimensions and correct file format.

Recent Comments

  • uno guio on Apps Magnet Auto Updater module for activeCollab is now free!
  • David Minton on activeCollab Feather – are you ready for it?
  • Scott McNamara on activeCollab Feather – are you ready for it?
  • Nirav Mehta on activeCollab Feather – are you ready for it?
  • Kaylakaze on activeCollab Feather – are you ready for it?

From Our Blog

  • activeCollab Feather – are you ready for it?
  • Faster Reports Plus Module
  • Chronograph Module Updated!

Categories

  • acGarage
  • acJournal
  • activeCollab
  • activeCollab Hacks
  • Communications
  • Customer Experiences
  • General
  • Modules
  • News
  • Paypal & Putler
  • Pigeon
  • PlannerX
  • Planning
  • Recommended Reading
  • Reports

Quick Links

  • About Us
  • Products
  • aC Compatibility Status
  • Live Demo
  • Resources
  • Blog
  • Contact Us

Latest from our blog

  • activeCollab Feather – are you ready for it?June 11, 2015 - 5:38 pm
  • Faster Reports Plus ModuleMay 5, 2015 - 6:40 pm
  • Chronograph Module Updated!April 21, 2015 - 4:54 pm

Learn About

  • 8 Tools For Project Success – that I have used for over a decade with awesome results…February 25, 2014 - 12:05 am
  • Ultimate Guide to Integrating your site with activeCollabIntegrate activeCollab with your website – The Ultimate GuideFebruary 20, 2014 - 1:52 am
  • Two Keys To Team Development2 Keys To Team DevelopmentFebruary 18, 2014 - 6:07 pm

Apps Magnet Network

  • Icegram – Capture Leads & Connect With Visitors – WP plugin
  • Putler – Life Changing Sales Analytics App
  • Store Apps – WooCommerce & WordPress plugins
© All rights reserved - Apps Magnet
  • Follow us on Twitter
  • Subscribe to our RSS Feed